 Mobile,Mobile Phone,Mobile SIM,Mobile Recharge,Mobile India Mobile Firm – Complete Mobile Solution Provider in India, Mobile,Mobile Phone,Mobile SIM,Mobile Recharge,Mobile Bill Payment,Mobile Apps,Mobile Apps in India
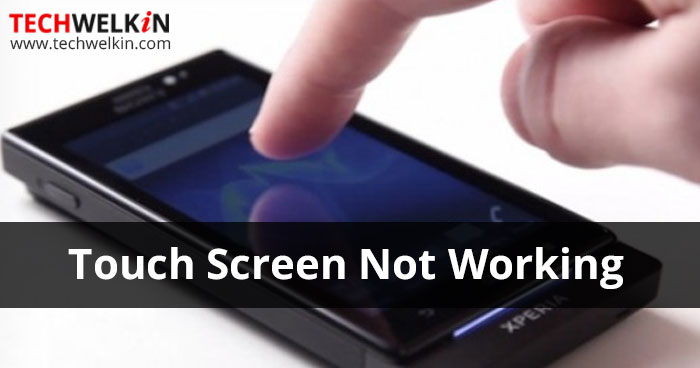
 Gone are the days of mobile devices that used keypad (but we still haven’t forgotten Nokia 1100, have we?!). Nowadays, smartphones and tablets use touchscreen for taking user input. Sometimes, we feel that touchscreen on our mobile device is not working smoothly. Touchscreen is not responding the way it used to when you had purchased your brand new mobile phone. We understand that touch input quality is better in some phones than other. But if a phone refuses to understand tap from your fingers, it becomes very annoying to use the phone.
Today we will talk about a few methods to solve the problem of touchscreen not working. All these methods are being listed assuming that there is no physical damage to your mobile’s screen. If you have a crack on touchscreen or it is totally broken, you better claim warranty if you can. But if touchscreen is not cracked, you can try the following methods to get it working.
Method 1: Touchscreen not Working? Well, Clean it up!
As time passes, because of constant use, touchscreen of your phone may acquire a layer of grease. After all we don’t wash our hands before touching the touchscreen! So, the screen accumulates oily substances, dust and what not! So, if you feel that your touchscreen is not working, first of all, give it thorough cleaning. Take a smooth cloth, damp it a bit in water and wipe the touchscreen gently (or may be a little harder than gently). Tilt the phone and see if clean screen is visible. If you see any more greasy marks, wife them off.
Method 2: Restart Mobile Phone to Rescue a Hung Touchscreen
Sometimes, it’s not your touchscreen who we should blame. Phone’s operating system (Android, iOS etc.) sometimes get hung and the whole phone becomes unresponsive. Power off your phone and remove battery. Put the battery back in and switch on the phone. If the touchscreen problem was because of your hung mobile phone, it would have been solved by now.
Method 3: Remove SIM Card, Memory Card and Battery
If the touchscreen problem persists, bear a bit more pain and again shutdown your phone. Remove SIM card, memory card (SD Card) and battery from the phone… and wait for a minute. Put it all together again and reboot the phone. See if touchscreen is behaving any better.
Method 4: Remove Screen Guard / Case
We really wonder why people are still opting for screen guards (protectors) on their mobiles. Nowadays, the quality of screen glass has become very good and screens are anyway scratch resistant. So there is hardly any need of a screen guard.
Sometimes, screen guards get scratched and blurred; causing mobile touchscreen malfunction. You should try and remove screen guard to see if touchscreen works again. Please note that you will not be able to apply the same screen guard again.
Also, some screen guards require a professional to peel it off the screen. So, if you’re not easily able to peel off the screen guard, take your phone to a professional to get the guard removed.
Method 5: Tap Tap Knock Knock!
If you have recently dropped your phone and it fell hard, there is a possibility that the screen alignment got disturbed and/or the screen digitizer cable became loose. You can’t do much in such a case except knock on all four corners of the screen in hope to get the alignment back in place. Surprisingly, this trick works in a lot of cases.
Just knock all four corners of the screen with your knuckle or finger tip. Knock each corner 4-5 times.
Method 6: Dry it up to Get the Touchscreen Working!
If you dropped your phone in water and after that the touch screen stopped working; you should switch off your phone. Now remove the SIM card, memory card and battery… also remove anything else that is removable. If it is easily possible to open your phone any further –do that (just don’t break anything!). Now spread all these parts (including the screen) under the sun and let them dry. Most phones are not fully water resistant. As a result, moisture may seep into your phone and block the functioning of touchscreen.
If touchscreen still doesn’t work, take your phone to a professional / service center. They can dry up your phone in a better way by submerging it in alcohol of a specific concentration.
Method 6: Hard Reset your Phone
If the touchscreen is still not working as expected, it is time to hard reset your phone. This option will set your phone back to factory settings (you can call it formatting your phone). Use of this option will remove all data from your mobile phone. You will lose everything that would be there in the internal memory. And it will be gone forever. All the messages, contacts, apps, bookmarks, photos, videos, songs, ringtone… everything will be deleted. Essentially, this option will make your phone just the way it was when produced in the factory.
Keypad Problems In Mobiles
Learn to Fix Mobile Phone Keypad Not Working – Problem and Solution – Mobile Phone Keypad not working and How to Solve and Fix Keypad Fault in any Mobile Cell Phone. These problem and solution apply to all brands and make of mobile phones including Nokia, SAMSUNG, iPhone, China Mobile Phones, Motorola, HTC, Sony, Blackberry, Alcatel, Apple, AudioVox, Benefone, Danger, FIC, Hagenuk, Palm, Kyocera, LG, Panasonic, Huawei, ZTE, Spice, Lava, Sony Ericsson, Micromax etc.
What is Keypad in a Mobile Cell Phone?
Types of Faults or Problems when Mobile Phone Keypad Not Working
- No Key Working or only Some Key Working.
- Keys need more pressure to work. Or when pressed a key works continuously.
- One key is pressed and some other key works OR when one key is pressed, some other key works simultaneously.
NOTE:
- In a Mobile Phone, when we press a Key and it works very slow then Reload Software to Solve the Problem.
- In all Nokia Mobile Phones, if only some key works or none of the keys are working then change the Keypad IC to solve the Problem.
- If Keypad problem is not solved by Hardware, then reload Software in the Mobile Phone to Solve the Problem.
Mobile Phone Battery Problem and Solution
Mobile Phone Battery Problem and Solution – Low Battery, Battery Drains Fast, Battery Backup Low, Battery Not charging. Learn how to fix these problems
Mobile Phone Battery Problem and Solution – Low Battery, Battery Drains Fast, Battery Backup Low, Battery Not charging. Learn how to fix these problems.
There are too many problems with the battery draining so fast of Modern smartphones. Most of them drain too fast or there is sudden discharge. Some of them have other issues and problems.
The proximity sensor on your phone automatically shuts down the display when you’re on an active call to avoid random touches and save battery. The sensor is visible as a small black dot on top of your phone screen. However, if the environment is not suitable, the sensor can act abnormally.
For instance, you might notice that it doesn’t turn off the display during a call. Or, the screen goes off, but it won’t light back up even after the call has ended. Such problems with the sensor can be due to physical obstacles or more. If you’re facing similar or other issues with the proximity sensor on your phone, this article has all the right fixes for you.
Why is Proximity Sensor Not Working on My Phone?
Here are a few possible reasons why the proximity sensor on your phone is not working:
- Dirt particles near the proximity sensor
- Hardware damage
- Physical obstacles, like the screen protector
- Corrupted software files
- Minor bugs
How to Fix Proximity Sensor Not Working?
Prior to using the fixes below, it’s important to verify if the proximity sensor is indeed not working or if it was only a rare glitch. First, restart your phone.
If you’re on an Android phone, hold down the Power button and the Volume down button for 10 seconds. But, different Android models can have other ways to restart as well. If you’re using iPhone 8 or above, hold and let go of the Volume Up key and then do the same for the Volume Down key. Then, keep holding down the Sleep/Wake button until you notice the Apple logo.
Then, you can test the sensor by keeping your phone close to your face or placing a finger over it. You can also try calling someone normally and check if the display goes off or not.
If you can confirm that the sensor is not working at all, here are some easy-to-follow fixes to try:
Clean the Proximity Sensor
For the proximity sensor to work properly, it needs to have a clean surface at all times. If there are visible dirt or debris particles stuck, the feature may not be able to sense your ear during an active call.
So, take a clean microfibre cloth and remove excess dirt from the sensor. You can use a Q-tip and clean the edges of the proximity sensor.
Check for Hardware Damage to the Proximity Sensor

After cleaning the proximity sensor, check if there is any hardware damage to it. To check it properly, you can use a flashlight and check if there are any visible cracks. If you see any, it’s best to leave the issue to the professionals. So, take your phone to a local nearby repair shop.
Take Off Screen Protector
Screen protectors can sometimes block certain parts of the sensor, causing it not to work properly. This is especially true if the tempered glass doesn’t fit your phone screen perfectly or is too thick. So, check if the sensor portion is covered.
Then, simply take the tempered glass off. Carefully hold the edge of the glass and slowly pull it out. If the glass is hard to come off, use any card, like a credit card, or use a blow dryer to loosen the adhesive glue. You can also clean if there are a few dirt particles.
After that, make a call and check if the sensor is back to working normally. Later, you can look for a screen protector that is thin and fits your phone model perfectly. This way, there’ll be no interference with your phone’s sensor.
Calibrate the Proximity Sensor
Calibration means verifying if the sensors on your phone are gathering the essential information properly. This effective solution is also great for fixing any malfunctions. A popular way of calibrating the proximity sensor is via secret codes.
Secret codes are a collection of various symbols and numbers that give you access to additional options on your phone. There are different codes for the Light sensor, Touch screen, and Proximity sensor. Here’s how you can apply the code for the proximity sensor.
- Open your phone keypad and type *#0*#
- Doing so will open the HwModuleTest mode. Select the Proximity Sensor option. Its code is *#*#0588#*#*
- Tap on Calibration.
- Now, restart your phone.
If you want an easier way of calibrating the sensor, you can also get third-party apps that will do the job for you. For instance, you can get the Proximity Sensor Reset app from the Play Store on an Android phone. But, there are no such apps on the App Store.
Update Your Phone’s Software
If you haven’t updated your phone’s OS for a long time, it’s common for your phone to act unusual due to frequent bugs and glitches. The proximity sensor can also be prone to such issues.
To resolve this, update your phone right away. To update an Android phone, go to Settings > About Phone. Then, tap on Check for Updates and install any available updates.
To update your iPhone, follow these steps:
- Go to Settings
- Tap on General > Software Update.
- Tap on Download and Install.
Factory Reset Your Phone
A failed proximity sensor issue can still be due to unknown reasons. So, if most solutions are of no help, you can reset your phone completely. This simple method can prove to be effective by eliminating any active bugs or potential viruses.
Then, you can proceed to reset your phone in this manner:
On Android
- Go to your phone’s Settings.
- Tap on System > Reset.
- You’ll notice several options to reset, like Reset app preferences. Tap on Erase all data.
- Tap on Erase All Data. Your phone will require you to enter your password to verify the changes.
- Tap on Continue and then select the Erase All Data option to proceed.
On iPhone
An easy way to reset your iPhone is using the Find My feature. You can perform these steps using the iCloud site on a computer.
- Log in to iCloud on a browser.
- From the list of options, click on Find iPhone.
- Now, click on All Devices. Then click on your iPhone.
- You’ll notice a pop-up menu where you’ll need to click on the Erase iPhone option.
- Select the Erase option again to confirm your changes.
Take Your Phone to a Local Repair Shop
If the proximity sensor still seems to be dead or glitching heavily, it’s best to take it to a professional. You can get it repaired or replaced at a local electronic repair store or the store of the associated brand.
Phone Speaker Problem Solution
Your phone speaker problem solution is here! Are you worried about your phone not ringing well or stopped ringing completely due to one thing or the other? The problem of phone speaker not ringing is very worrisome as one finds it difficult to even know when a call comes in.
The cause of this problem could be multifaceted, thus, it is very important that you try and figure out what you did or something that happened before your phone stopped ringing well or completely. In this post, I will be showing you how to figure out this problem and deal with it squarely so you could get your phone working perfectly again!
Causes And Solutions
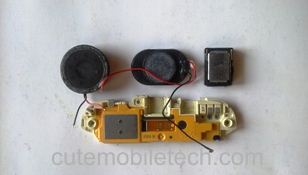
The compact size component called the speaker [ringer or buzzer] is mostly found at the base of the phone when held in call position. phone speaker problem makes it impossible for people to hear their phone ring when there is an incoming call. The following could be responsible for a faulty ringer in a mobile phone:
1 Tampered Settings
2 High/Low resistance value
3 Oxidation
4 A bad/partial contact
5 Short or Open Circuit
Tampered Settings
From experience, I have found out that most phone speaker problem are settings related! Whenever you notice that your phone doesn’t ring out loud or is on a very low ringing output or you don’t hear it ringing at all, what you need to do first is to check your phone’s settings and adjust the ringer volume settings to a desired level and if the problem is coming from there then all should be with your ringer.
High/Low resistance value:
This factor, like in the case of the mouth piece, it also affects the ringer of a mobile phone thereby affecting its performance. The resistance value of a healthy mobile phone ringer ranges between 8 to 10 Ohms using the Ohms meter. When the resistance value of the ringer is less than 8 Ohms, the ringer gets louder and this can cause the ringer to damage prematurely and also when the resistance value of the ringer is higher than 10 Ohms the effect will be that the ringer will ring faintly.
Furthermore, there are times that you might not even hear your phone ring at all because the ringer has become completely dead. To solve this problem, if you do not have or do not even know how to use a multi or Ohms meter, simply get an old unused scrap phone remove the same speaker and fix it in to your phone and you are done if it gives you that nice cool sound output.
For more details, please contact us on
Sales Number : +91 9582 90 7788
Support Number : +91-9654 01 6484
Sales Email : sales@itmonteur.net
Support Email : support@itmonteur.net
Register & Request Quote
Submit Support Ticket
